The €30 and cents, Durable, Easy Repairable on Site Remote Monitoring of Concrete Maturity
and it can go as low as $5. Over the next weeks, I will be talking about IoT devices for monitoring concrete maturity at huge, large, or small construction sites. So make sure to check it regularly...
The other day, someone whispered to me, here in the neighborhood where I live, “why not develop your own“ maturity sensor device, after I ended a short chat session on WhatsApp about it. At that time it was meant to be a simple chat conversation starter on WhatApps with my long-lasting research colleagues in science1.
A week went by and I continue doing what I have initially planned: modeling2 in Tensorflow some research data I have here, from my 1st masters’ thesis about self-sensing carbon fiber composite sensors for IoT applications. During that time, I got some time to browse what is already on the market, for monitoring concrete maturity in real-time and with live data. I found the following enterprises already commercializing IoT devices with that specific purpose:
After the initial contact with those enterprises sales representatives, Maturix already agreed on sending me their device for me to have some tests with it during 30 days.
Their Device is for sale at a little over €400 for each unit.
I’ve also contacted LumiCon, a Canadian enterprise, after the initial contact with them asking for a test pilot run, I was told they only could make a discount price on their devices. The LumiCon price on their maturity IoT device sensor starts around $300 for each unit.
Everyone who knows me knows well my electronics skills in assembling such a device, and nowadays, with the explosion of open source hardware electronics, protagonised by the worldwide famous Italian Arduino brand, prototyping, and product development is as easier as it can be. So I accepted the challenge and decided to do, what I usually do, and test the practicality of the commercially available solutions, not only on price but more importantly on :
durability / reusability
dummy-proof repairability
dummy-proof maintenance
dummy-proof onsite setup, installation, and operation
all above, considering the nowadays current minimum requirements when considering IoT monitoring solutions and measured on
open-source ready and friendliness
open-data ready and friendliness
local availability or replacement parts for far away and remote site environments
During this article series, I am also taking into consideration in the analysis the following:
Everyone knows construction workers are always busy moving from place to place at the construction site
Placement of the sensor unit is very important
Not allowed to have wires hanging around.
The sensor unit is to be mounted in the spot and while casting the fresh concrete (max 2min install time)
The surrounding environment of any construction site: weather and accessibility by strangers looking for a souvenir
The physical dimensions of the construction site: from small areas suitable for construction of a dwelling to huge, large scale construction works such as public transport gare, airports, bridges, shopping malls, train stations, maritime ports, etc…
So let’s being this project, by takings notes on all the hardware specifications on each product commercially available and also their operation and usage specifications. Next, is needed to order some parts online, that match previously noted specifications. This time I’ve done my shopping on AliExpress buying all the components necessary to build one sensor unit myself. The total overall parts cost some cents over €40. Here’s the list of what I ordered:
ABS housing DIY sensor control case 72*39*15mm
Waterproof ABS Junction Box 89*59*35mm
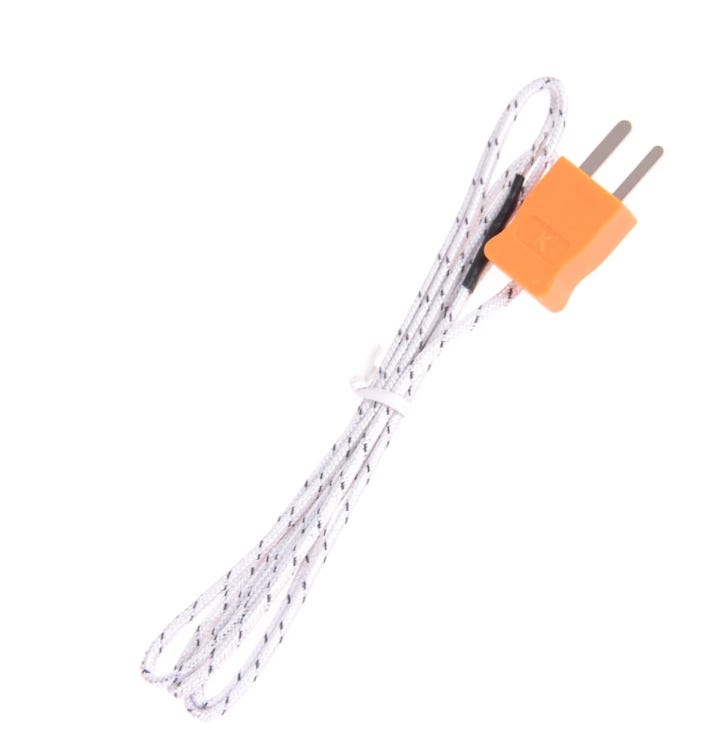
100cm K-type Test Length 1Meter Wire Temperature Thermocouple Sensor
alternatively, the Arduino board can be replaced by a cheaper board, The NodeMCU V2 board with integrated WIFI, lowering the total overall parts cost to around €30 per unit.
The final look of what I’ll be assembling will look like the photos below. Solution 1, uses an ABS housing DIY sensor control case with dimensions of 72x39x15 mm (see photo 1).
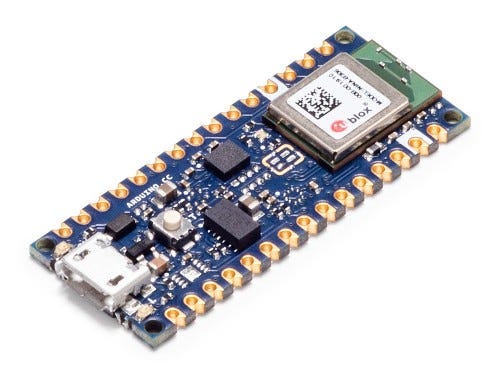
Solution 2 uses a Waterproof ABS Junction Box 89*59*35mm (see Photo 2). Both solutions will have the same hardware electronics, an Arduino nano 33 BLE (see specifications here), a hardware board with ultra low power Bluetooth BLE powered by a 9V or a 12V common supermarket battery, found on any grocery store at the end of the road.
By now the reader, maybe thinking, this all sounds all great and awesome, but I don’t know a thing about electronics hardware or how to assemble one. And you are right, however, don’t take it in, dismiss it, and go on with your life. This article is about dummy proof simplicity, meaning anyone, literally, anyone can assemble such as sensor requiring some basic reading of tutorials available on google or on youTube. Is that simple! is that easy! Plus, you, the reader, when managing construction site operations, will always have the possibility to arrange a remote Google Meet on Zoom meeting for live tech support.
Since this device, requires temperature readings from the cast concrete at the construction site, I’ll be using the same K-type sensor thermocouple. The one I ordered has only 1 m length, but it can be ordered on 50m 100m rolls for extra additional savings.
In my next article about this setup, I will be presenting the assembly process and include a YouTube video showing all from start to finish.
To the end of this article series, I will write about the code needed to be installed and run, and present a basic, simple code for connecting to an Android smartphone App. When all done it will be possible to visualize data and also to communicate with any enterprise Cloud API. This is the most basic setup possible to simulate any construction enterprise IT infrastructure for this type of real-time monitoring. At the end, I will present a basic cost planning for, building, repairing, maintaining, and operate a local installation of these devices at any construction site.
Here’s a short summary list of what to expect in the upcoming weeks:
This article, presenting and comparing to an open-source and open-data IoT solution
Hand on tutorial on how to assemble one unit
The minimal code needed to run on each sensor unit and on the network it connects
Basic cost planning for building, repairing, maintaining, and operate a local installation of these devices at any construction site.
It’s Friday, it’s sunny and tomorrow is a well-deserved weekend. Don’t forget a long walk in a nearby park. To relearn what is nature.
Until next time, don’t forget to share, and if possible, subscribe for fairness of work3 and a fairer economy, or instead buy me a coffee and promote at the same time open source writing.
Don’t forget to join my Official Facebook page or Connect to my Official Twitter Account @AeonLabsS. For small POSTS and Comments about views happening during my day at work. On the spot and unfiltered.
By the way, how is democratization going in academia and on scientific research? catching up with the times, or still in denial about the awesome advantages of open data and open source?
Is now almost 8 weeks since my computer is running for modeling some artificial neural networks (ANN) with different architectures and NN setups
This article is looking for sponsors to grow. Consider giving a donation by Paypal to the author using the email mtpsilva@gmail.com or at least buy him a coffee by clicking on the above image link.
This article took almost 2H to write plus the planning and behind the scenes (about 10h).
This is the very first draft version of a future document. As part of my research on online live writing, no proofreading was made to this text. Only Basic automated corrections. Over time the reader can expect additional changes to the text without prior notification: bugs, error correction, and also content adding. So make sure to check back later the article.
If the reader, instead, prefers reading well-formatted text paragraphs, error-free; perfect notations; high-resolution graphics, figures, photos, and videos, please consider subscribing on substack.com to a monthly or yearly plan. To do so, the reader can start by clicking on the “subscribe now” button above.


